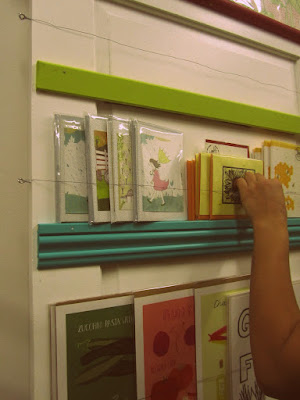
Its time again for another easy and fun DIY project that we have tested out for you! This time around we created a paper goods display out of an old door and base boards. This is a perfect way to display cards for at a retail space or photos or even books & artwork at home! We love how easy it was to make( we made it the night before we re-opened) and it is very customizable too.
DIY Paper Goods Shopping List
-paint
-scale
-old door (or new depends on what you can find)
-base boards(depends on how much you display)
-nails (2-3 per baseboard)
-eyelets (2 per baseboard)
-fishing wire/metal wire
8 Easy steps to making a paper goods display
1. The first thing you need is an old door, you can get these from a lumbar yard, craigslist or buy a new one from home dept. Once your door is selected make not of its width and write this information down.
2. Next step is selecting a variety of base boards which you can find at a lumber yard or in the scrap area of home depot. We chose 6 different base boards for our door. You will want your baseboards to have a thickness of 1" or more to display on top of. *Make sure that the base boards are cut to the same width as the door.
3. Lay down the door on the floor and place base boards in a way that looks appealing to you and will effectively display your art/cards etc. Now you will have a visual of how you want it to look so you can either take a photo or put a pencil mark saying the number order of the baseboards.
4. Now its time to paint those baseboards. You will do this separately from the door (less messy). We did alternating colors that matched the shop theme of citron, fuchsia and turquoise. You can choose any color you like. You can also paint the door whatever color you would like. We chose white as a background for our display.
5. Once the paint has dried on the door and baseboards you can begin assembling them together. Once again layout your baseboards in desired places and check with a scale that they are straight. Then you can nail the baseboards into the door.
6. Next you will get your eyelets and assemble them onto the side of the door 2"-3" above each baseboard. You can use your scale to make sure these match up.
7. Tie fishing wire/metal wire into one eyelet and pull across the front of the door to the corresponding eyelet. This forms a barrier for the artwork/cards to keep from falling down.
8. Begin placing your artwork, cards and books onto your super cute and easy DIY display!
Below: Are some photos of us in the process of constructing the display.
A few of our color coordinated baseboards ready to go.
Beginning to nail down the baseboards onto the door.
Finished nailing, now ready to add eyelets and begin displaying.
Eyelets have been added, you can see them on the side. Now time to display all the cards and posters.
Our finished project in all its glory! Now that wasnt so hard now, was it!!
If you have any questions about this project let me know and I will gladly help out.
Hmm what should our next DIY be? Any suggestions or projects you have seen in the shop that you want to know how we made?
MORE DIY PROJECTS


