Showing posts with label paint. Show all posts

Thursday, October 4, 2012

Confessions Of A Procrastinating Emotional Painter

     Somewhere between last week and today I began painting again. I had a proposal placed upon me at work a few weeks ago to paint a Rib-cage onto two mannequins for a window display. This seemed an easy task when I was first told. But it wasn't till last week that the pressure began to cave in on me. I had to start working on those mannequins! And soon. So I did what I do best, work under pressure(little sleep). 

   I rose to the task. I felt like a student again. Anxiously awaiting the finishing line of my most recent project at hand. Unlike so many times I had felt a different kind of pressure. It was not a pressure of anxiety or stress. More like a release of pressure that had been building up inside of me. The procrastinator in me was releasing the stress that had been waiting to just come out. With each stroke of the brush I felt like a layer was peeling off. 

Follow me on Instagram @Decoaurora
     After 4 hours of painting in the heat I was left with two stunning mannequins. I would name them the Mannequin Graveyard on my Instagram. Proudly showing them off to anyone who would look, let alone LIKE them. Isn't it thrilling to have complete strangers liking your life in pictures! Social networking boggles my mind sometimes, amazing. 

Follow me on Instagram @Decoaurora

          Over the next few days I was still rolling off that high whether it was from the paint or the likes on Instagram... I was inspired and I needed to do something about it fast. 

     On a whim I entered Michael's A.K.A. the craft Haven to look for some essentials for my newly re-discovered CRAFT! To my delight I was lingering up and down the aisles looking at an array of canvas styles and sizes along with paint and brushes galore. What to do, what to do.

     My younger broke college student self would say ah F#$@! it and just leave empty handed. I chose to go with my instinct. Being the weirdo that I'am, I left my new paint friends in the car for a few days, this is a strange habit I have. I needed to sit on it, what it was I wanted to paint exactly. So after a day of letting my mind wander, (and my paint melt in the car). I decided It was time! 

     As you can see from the photo from above, I was able to paint something...with my own two hands plus a paint brush or two and my imagination. I originally had something else that I wanted to paint, but somehow ended up with this masterpiece! Isn't it funny how things happen? Its like the saying "Life is what happens when you're planning it"...or however it goes. Same thing goes for my paintings I guess. 

Do you paint or craft?
What inspires your arts and crafts? 


Saturday, July 7, 2012

Everyday Neon

I make it look easy :)
     I would have to say that one of my favorite things to do is design window displays! It is a great mix of fashion and interior merchandising. So how could I not love this? This past summer at Road Less Traveled we featured two of my displays that I made from recycled materials, plastic cups and cardboard boxes. 

     My vision was bright neon, graphic, everyday items in unusual forms. I absolutely love how it all came together in the end. Take a look below, and as always Im available for consultations for window display services. Let me know. 

The cups were painted to resemble the blanket.


A view from outside.

Ladders and Neon Cardboard sparked interest in onlookers.


Wednesday, May 9, 2012

DIY Card DIsplay


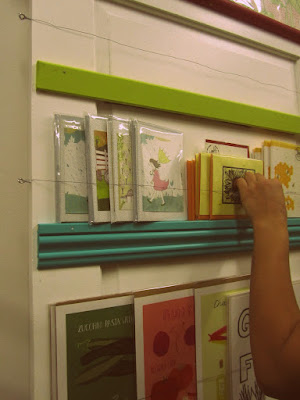
Its time again for another easy and fun DIY project that we have tested out for you! This time around we created a paper goods display out of an old  door and  base boards. This is a perfect way to display cards for at a retail space or photos or even books & artwork  at home! We love how easy it was to make( we made it the night before we re-opened) and it is very customizable too. 

DIY Paper Goods Shopping List
-paint
-scale
-old door (or new depends on what you can find)
-base boards(depends on how much you display)
-nails (2-3 per baseboard)
-eyelets (2 per baseboard)
-fishing wire/metal wire 

8 Easy steps to making a paper goods display

1. The first thing you need is an old door, you can get these from a lumbar yard, craigslist or buy a new one from home dept. Once your door is selected make not of its width and write this information down.

2. Next step is selecting a variety of base boards which you can find at a lumber yard or in the scrap area of home depot. We chose 6 different base boards for our door. You will want your baseboards to have a thickness of 1" or more to display on top of. *Make sure that the base boards are cut to the same width as the door. 

3. Lay down the door on the floor and place base boards in a way that looks appealing to you and will effectively display your art/cards etc. Now you will have a visual of how you want it to look so you can either take a photo or put a pencil mark saying the number order of the baseboards. 

4. Now its time to paint those baseboards. You will do this separately from the door (less messy). We did alternating colors that matched the shop theme of citron, fuchsia and turquoise. You can choose any color you like. You can also paint the door whatever color you would like. We chose white as a background for our display. 

5. Once the paint has dried on the door and baseboards you can begin assembling them together. Once again layout your baseboards in desired places and check with a scale that they are straight. Then you can  nail the baseboards into the door. 

6. Next you will get your eyelets and assemble them onto the side of the door 2"-3" above each baseboard. You can use your scale to make sure these match up.

7. Tie fishing wire/metal wire into one eyelet and pull across the front of the door to the corresponding eyelet. This forms a barrier for the artwork/cards to keep from falling down. 

8. Begin placing your artwork, cards and books onto your super cute and easy DIY display! 

Below: Are some photos of us in the process of constructing the display. 

A few of our color coordinated baseboards ready to go. 

Beginning to nail down the baseboards onto the door. 

Finished nailing, now ready to add eyelets and begin displaying. 

Eyelets have been added, you can see them on the side. Now time to display all the cards and posters. 

Our finished project in all its glory! Now that wasnt so hard now, was it!!

If you have any questions about this project let me know and I will gladly help out. 

Hmm what should our next DIY be? Any suggestions or projects you have seen in the shop that you want to know how we made? 

MORE DIY PROJECTS

Monday, March 26, 2012

DIY Chalk Board Wall


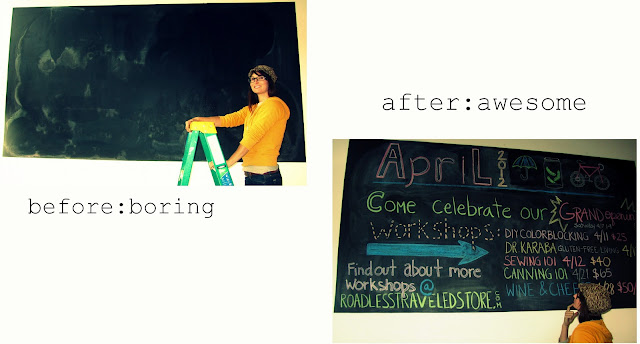
Hey everyone, If you have been to the road less traveled store than you have surely seen our massive chalkboard wall near our craft/workshop area. This was one of the first DIY projects we took on when we moved into the new space at GCAC. Our chalkboard has been the perfect place for our monthly workshops to be displayed and it always looks awesome thanks to Leigh Slater, our chalk artists and program coordinator. 

Leigh recently re-did our chalkboard for April so I sat down and talked with her about her inspirations and some tips for making your chalk pop off the board. But first let me tell you how we created our chalk board. Its easy and doesn't cost very much money to create on your own. 

DIY chalk board supply list:
scale
painters tape
measuring tape 
paint brushes
chalk paint  
(we used rust-oleum specialty chalk paint)

5 easy steps for making a chalk board wall:
1. The first thing we did was figure how tall and wide we wanted our chalk board to be. It is really up to you how big or small. We chose for ours to be HUGE.

2. We pulled out our scale and measuring tape and started to measure out our chalk board on the wall. Use the scale to make sure your lines are straight. Place painters tape on the wall in small pieces because its easier than one long strip. 

3. When you are done placing tape on the wall stand back and make sure everything looks right and is straight .
4.Prepare chalk paint and begin painting it onto the wall (we used one layer of paint) and let dry. 

5.After paint has dried peel painters tape off of wall and check for any areas that may need some touch-ups.

Congrats you have completed your first DIY chalkboard wall!


Now check out how chalk artist Leigh Slater makes our monthly chalkboard calendar come to life! 
* dip your chalk in water for a crisp and bright look *

* brainstorm your inspirations on paper before you start drawing on the board *

* be safe and use a ladder for hard to reach places *


* keep a wet towel handy for erasing chalk * 


* step back and admire your work, because after all you did it yourself *